# django-openapi
A minimal FastAPI implementation in Python2 + Django without pydantic
# Why do you make this? Can't you just use FastAPI directly?
I'm a big fan of [FastAPI](https://fastapi.tiangolo.com/). It's elegant and saves lots of doc maintaince & API spec communication costs for me.
But FastAPI needs Python3 to run, some legacy projects I maintained are still using Python2 and built by Django framework. It would take 2 migration steps (Python 2 to 3 and Django to FastAPI) for moving them onto FastAPI framework.
So I decided to build a minimal FastAPI implementation in Python2 + Django, that I could instantly get the benefits from FastAPI without too many migrations on my legacy projects.
# Who should use this?
People who like the way FastAPI works but
* Are still on the long migration process from Python2 to Python3
* Or don't want to do full system rewrite from Django to FastAPI
* Or don't want to upgrade from Python2 to Python3
# Features
* Auto OpenAPI schema/document generation from Python function parameter
* Auto HTTP request parameter validation from Python function parameters
* Python 2/3 compatiable, you could use almost the same code for you Python2/3 projects
# Installation
```
pip install django-openapi
```
# Live demo provided by Gitpod
Click the button below and launch a free live demo server via Gitpod
[](https://gitpod.io/#https://github.com/tokikanno/django-openapi)
If the button doesn't show up, you clould also use below link directly
[https://gitpod.io/#https://github.com/tokikanno/django-openapi](https://gitpod.io/#https://github.com/tokikanno/django-openapi)
After Gitpod launched, if you see a dialog like this, just hit the `Open Browser` button then you will get to the quick intro live demo server.

Use ctrl + p (or cmd + p if u're using MacOS X) and search for `intro.py` to see the source code of intro demo server.
# Quick start
### In your Django project
* Import `OpenAPI` from `django_openapi`
* Create an API object instance
* Add API object into urlpatterns
```python
# import OpenAPI from django_opeanapi
from django_openapi import OpenAPI
# create an API object instance
api = OpenAPI(title='My OpenAPI Test', prefix_path='/test_api')
urlpatterns = [
api.as_django_url_pattern() # Add API object into urlpatterns
]
```
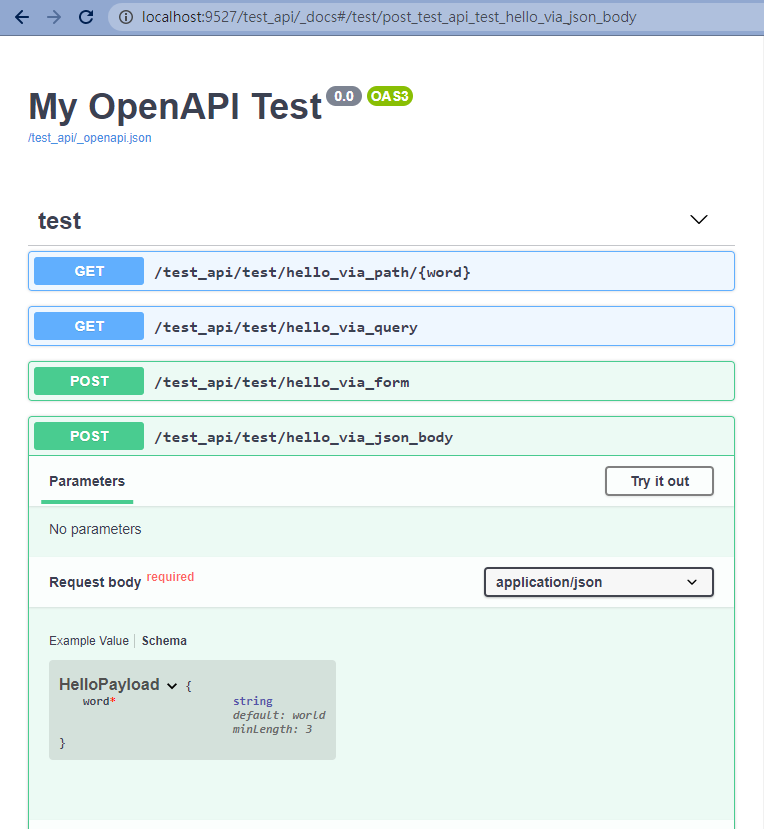
* Start you django debug server and open your browser with url like `http://localhost:8000/test_api/_docs`, this is the auto document page.
* Now let's try adding some basic routes for you API
```python
from django_openapi import Path, Query, Form
@api.get('/test/hello_via_path/{word}', tags=['test'])
def hello_via_path(word=Path()):
return {'hello': word}
@api.get('/test/hello_via_query', tags=['test'])
def hello_via_query(word=Query()):
return {'hello': word}
@api.post('/test/hello_via_form', tags=['test'])
def hello_via_form(word=Form()):
return {'hello': word}
```
* Reload your browser & see if anything changed to the auto document page
* Advanced routes via JSON body & JSON schema object
```python
from django_openapi import Body
from django_openapi.schema import BaseModel, StringField
class HelloPayload(BaseModel):
word = StringField(default_value='world', min_length=3)
@api.post('/test/hello_via_json_body', tags=['test'])
def hello_via_json_body(payload=Body(HelloPayload)):
return {'hello': payload.word}
```
* Reload agagin, the auto document page now should have 4 APIs on it.
Browse to the [demo folder](https://github.com/tokikanno/django-openapi/tree/master/demo) for more advanced samples.
# TODO
* More documents and samples
* Better schema validation error message handling
* More advanced field types (e.g.: EmailStringField, CommaSeparatedArrayField ...)


