[](https://pypi.org/search/?c=Development+Status+%3A%3A+3+-+Alpha)
[](https://pypi.python.org/pypi/DATGAN)
[](https://pepy.tech/project/datgan)
# DATGAN
Directed Acyclic Tabular GAN (**DATGAN**) for integrating expert knowledge in synthetic tabular data generation.
- License: [GPLv3](https://github.com/glederrey/DATGAN/blob/master/LICENSE)
- Development Status: [Alpha](https://pypi.org/search/?q=&o=&c=Development+Status+%3A%3A+3+-+Alpha)
- Homepage: https://github.com/glederrey/DATGAN
## Overview
The **DATGAN** is a synthesizer for tabular data. It uses LSTM cells to generate synthetic data for continuous and
categorical variable types. In addition, a Directed Acyclic Graph (DAG) can be provided to represent the structure
between the variables and help the model perform better. This model integrates two types of conditionality: rejection by
sampling and conditional inputs.
## Requirements
The current version of the **DATGAN** works with Python>=3.7 and Tensorflow==2.8.0. Previous versions of Python have not
been tested and are thus blocked. Therefore, we recommend the user set up
a [virtualenv](https://virtualenv.pypa.io/en/latest/). An installation guide is provided to help with the installation
of the library.
## Installation
We provide a [complete installation guide](https://github.com/glederrey/DATGAN/blob/master/INSTALL.md) using conda and
setting up a virtualenv. Please follow this guide to properly set up everything and ensure that you can use the DATGAN
as intended.
## Testing the DATGAN
Once you have followed the installation guide, you can clone this repository and use the notebooks provided in the
folder [example](https://github.com/glederrey/DATGAN/tree/main/example) to train the **DATGAN** and use the evaluation
metrics provided in this repository.
# Data Format
## Input
The **DATGAN** uses tabular data loaded with the `pandas` library. This table must follow these rules:
- has no missing values
- has columns of types `int`, `float`, `str` or `bool`.
- each column contains data of only one type.
**NOTE**: It is crucial to identify continuous and categorical variables/columns. A general rule of thumb is that any
discrete distributions with a large number of categories should be considered continuous and then rounded.
## Output
The output of the **DATGAN** is a table of synthetic data with the same columns as the input table and as many rows as
requested.
# Tutorial
This short tutorial will guide you through a series of steps that will help you get started with the most basic usage
of **DATGAN** to generate samples from a given dataset.
While all the methods are explained below, you can use the built-in helper function to get a reminder of the different
functions used in this library. Just run the following lines:
```python
import datgan
help(datgan)
```
### 1. Load the data and provide info about it
The first step is to load the data, which we will use to fit the **DATGAN**. We provide the **CMAP** (Chicago
Metropolitan Agency for Planning) dataset in the example folder. It is a travel survey dataset for the city of Chicago.
The dataset has already been cleaned compared to the original dataset. It contains 15 columns and 8'929 rows.
You can load this dataset using `pandas.` You also need to provide the data type for each column. For the moment, only
two possibilities are implemented: `continuous` and `categorical.` For `continuous` columns, you can pass more
information to the model, such as:
- `discrete` [**mandatory**]: Boolean value to indicate if the synthetic value has to be rounded when sampling
- `bounds` [**optional**]: Values of the bounds. While sampling synthetic data, all values outside the bounds will be
discarded.
- `enforce_bounds` [**optional**]: Instead of removing synthetic data generated outside the bounds, we will clip the
values to the bounds. (*This can be useful in the case of a mixed distribution with a peak of values close to the
lower or the upper bound.*)
- `apply_func` [**optional**]: You can provide a lambda function that will be applied before the encoding step and when
sampling the final values. This can help train models on distributions that are more difficult to represent by GMMs, *
e.g.* exponential distributions.
```python
import pandas as pd
import numpy as np
df = pd.read_csv('./data/CMAP.csv', index_col=False)
data_info = {
'distance': {
'type': 'continuous',
'bounds': [0.0, np.infty],
'discrete': False,
'apply_func': (lambda x: np.log(x + 1)),
},
'age': {
'type': 'continuous',
'bounds': [0, 100],
'enforce_bounds': True,
'discrete': True
},
'departure_time': {
'type': 'continuous',
'bounds': [0, 23.999],
'discrete': False
}
}
# For the categorical columns, we can simply add them using a for loop
for c in df.columns:
if c not in data_info.keys():
data_info[c] = {'type': 'categorical'}
```
> **WARNING:** While using a lambda function in the `apply_func` parameters, we use the `pynverse` library to compute the inverse of the given function. Therefore, with more complex functions, it is possible to get Warnings while sampling the final synthetic data. This is a normal behavior when `pynverse` is having trouble computing the inverse of some values.
### 2. Create a DAG
The second step consists in creating the DAG for the DATGAN. The DAG is created using the library `networkx` from
Python. The only constraint while creating the DAG is that it should not contain any cycle (by definition). In the
article, we give more details on creating the DAG. However, this process can still be cumbersome and requires trials and
errors to obtain a good DAG. (*We highly recommend using a "visualization" tool to create the DAG.*)
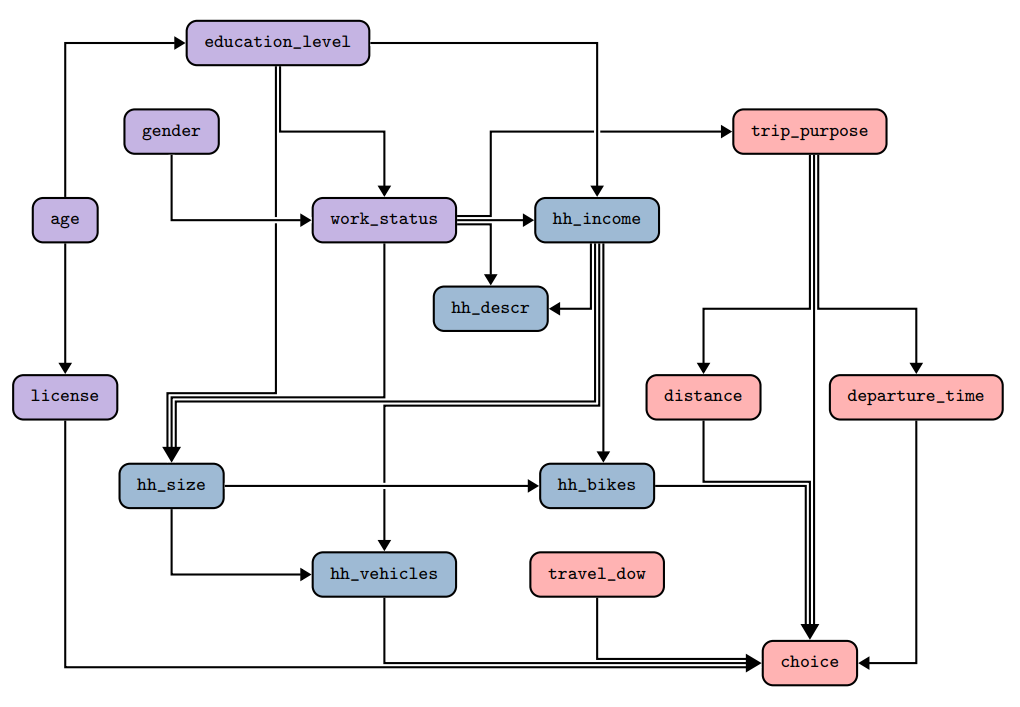
Below, we provide an example of a DAG for the CMAP dataset. First, the picture shows a visual representation of the DAG.
The colors of the nodes show the categories of variables: purple corresponds to individuals, blue to households, and red
to trips. The image shows that nodes can be the source and the target of multiple edges. While the direction of the
edges do not play an important role, we recommend having as few sink nodes as possible. The
[**DATGAN** article](https://arxiv.org/abs/2203.03489) provides more details on building the DAG.
The above DAG is represented in the `networkx` library as the following way:
```python
import networkx as nx
graph = nx.DiGraph()
graph.add_edges_from([
("age", "license"),
("age", "education_level"),
("gender", "work_status"),
("education_level", "work_status"),
("education_level", "hh_income"),
("work_status", "hh_income"),
("hh_income", "hh_descr"),
("hh_income", "hh_size"),
("hh_size", "hh_vehicles"),
("hh_size", "hh_bikes"),
("work_status", "trip_purpose"),
("trip_purpose", "departure_time"),
("trip_purpose", "distance"),
("travel_dow", "choice"),
("distance", "choice"),
("departure_time", "choice"),
("hh_vehicles", "choice"),
("hh_bikes", "choice"),
("license", "choice"),
("education_level", "hh_size"),
("work_status", "hh_descr"),
("work_status", "hh_size"),
("hh_income", "hh_bikes"),
("hh_income", "hh_vehicles"),
("trip_purpose", "choice")
])
```
If your DAG contains node that are not connected to any other nodes, you still need to add them. To do this, you can
use the `add_node` method of the `DiGraph` object.
```python
graph.add_node("single_node")
```
If you do not know how to create your DAG, it is possible not to provide any DAG to the model. However, in this case,
the model will define a _linear_ DAG, _i.e._ each variable in the dataset is linked to the next one following the order
of the columns. It can be helpful to test the model quickly. However, it will reduce the model's performance, as shown
in the article.
To help build the DAG and know which edge should be added, we implemented a function named `advise` that computes
Pearson and Spearman correlations and then suggests some links that could be added to the DAG. The suggested links are
the ones with the highest correlations.
```python
import datgan
datgan.advise(df, graph, plot_graphs=True)
```
Results (without the graphs) should look like this:
```
You might want to add the following edges in your DAG (direction not given here):
- license <-> education_level
- license <-> work_status
- hh_vehicles <-> hh_descr
- hh_bikes <-> age
- hh_size <-> age
```
### 3. Create a DATGAN instance
The next step is to import **DATGAN** and create an instance of the model. There are no required parameters for the
model. However, we advise you to set up the basic parameters such as the output folder (`output`), batch
size (`batch_size`), and the number of epochs (`num_epochs`).
```python
output_folder = './output/'
batch_size = 1116
from datgan import DATGAN
datgan = DATGAN(output=output_folder, batch_size=batch_size, num_epochs=1000)
```
> **NOTE:** Setting up a suitable batch size is really important. A batch size too big will make the model crash due to memory error, while one that is too small will make the model slower to train. Trials and errors are required depending on your hardware. In addition, it is good to find a batch size such that `len(df) % batch_size` is as small as possible since the last batch of data is dropped if it is smaller than the batch size.
### 4. Preprocess the data (optional)
The fourth step consists in preprocessing the data. This step is optional since it is automatically done in the next
step if skipped right now. We propose to do the preprocessing in advance because it usually takes a bit of time. And if
you want to try multiple parameters with the **DATGAN**, you do not have to preprocess the data every time. Therefore,
it is possible to do it before fitting the model and saving it somewhere.
```python
datgan.preprocess(df, data_info, preprocessed_data_path='./encoded_data')
```
> **NOTE 1:** If you decide to change any values in the metadata dictionary `data_info`, you must preprocess the data again. However, since the preprocessing of the continuous variable is random, you will not be able to sample a model trained on a previous preprocessed dataset with the current one. Therefore, we advise not to delete the previous preprocessed dataset.
>
> **NOTE 2:** In the folder `preprocessed_data_path/continuous`, you will find PNG files of the continuous distributions. These pictures can be used to make sure that the Variational Gaussian Mixtures (VGM) were correctly trained for each continuous distribution. It can be especially useful if the user is trying to use a lambda function.
### 5. Fit the model
Once you have a **DATGAN** instance, you can call the method `fit` and pass the following parameters:
- `data`: the original DataFrame
- `graph`: the `networkx` DAG
- `continuous_columns`: the list of continuous columns
- `preprocessed_data_path`: the path to the preprocessed data if done in Step 4 or the path where to save them.
```python
datgan.fit(df, data_info, graph, preprocessed_data_path='./encoded_data')
```
> **NOTE:** Depending on the verbose level, the model will show different types of information. The standard level is 1, displaying a progress bar for the whole training process. With level 2, the model will display information at each epoch. With level 0, the model will not print any information.
### 6. Sample new data
Once the model has been fitted, you can generate new synthetic data by calling the function `sample`. You have to
provide the desired number of samples.
```python
samples = datgan.sample(len(df))
samples.to_csv('./data/synthetic.csv', index=False)
```
### 7. Save and load a model (optional)
Fitting the model can take a substantial amount of time. It is, thus, better to avoid fitting a new model every time we
need to generate samples. We advise to save checkpoints of the model while it is training. However, if you do not want
to do that, the model will always keep the latest checkpoint once it has finished training. You can, thus, load it at
any time afterward.
You can simply call the function `load` with the parameters used while fitting the model to load the model. To save
memory, we only save the parameters of the Generator and Discriminator. Therefore, more information is required to load
the model.
```python
new_datgan = datgan.load(df, graph, preprocessed_data_path='./encoded_data')
```
> **NOTE:** This can be replaced by using the function `fit` once again. Since the model has already been trained, it will just load it.
## Conditionality
Conditionality can be used in two different ways. The first one is done after training the **DATGAN** model. You can
provide a dictionary of desired values and passes it to the sampling method. The **DATGAN** model uses rejection
sampling to provide the desired output. The second method consists in training the **DATGAN** using conditional inputs.
To use the second conditionality, the model has to be trained again.
### Rejection sampling
In the `sample` function of the **DATGAN**, you must provide a dictionary as follows:
- **categorical variables:** string or list of strings for the desired categories.
- **continuous variables:** lambda function returning a boolean value.
For example, suppose you want only to generate synthetic data about men under 30 years old. In that case, you can
provide the following dictionary to the `sample` function.
```python
cond_dict = {'age': lambda x: x < 30, 'gender': '0'}
samples = datgan.sample(len(df), cond_dict=cond_dict)
samples.to_csv('./data/synthetic.csv', index=False)
```
> **WARNING:** Since the **DATGAN** is using rejection sampling to provide the desired values, you cannot provide a conditional dictionary that is too restrictive. This will significantly slow the sampling process and even make it fail. In some specific cases, you can set the parameter `timeout` to `False` if you do not want the sampling process to be stopped.
### Conditional inputs
The conditional inputs are columns present in the original dataset. To train the **DATGAN** model, you need to provide
the list of columns you want to consider as conditional inputs. For example, suppose you want the age, gender, and trip
purpose to be conditional inputs. In that case, you can initialize the **DATGAN** model this way:
```python
datgan = DATGAN(output=output_folder,
batch_size=batch_size,
num_epochs=1000,
conditional_inputs=['age', 'gender', 'trip_purpose'])
```
Suppose the model is initialized in such a way. In that case, it will automatically transform the DAG. Each of the
conditional variables is considered a source node in the DAG. It will then train the generator using the values for
these variables as inputs. Finally, to sample the synthetic data, you need to provide a `pandas.DataFrame` or a `dict`
with columns/keys corresponding to the conditional inputs defined in the initialization. You do not need to care about
the size of the DataFrame since the model automatically samples values from it. You can, thus, provide any values you
want (a subset of the original dataset, unique values, or values generated by another model on another dataset.)
In addition, the rejection sampling conditionality can be used alongside the conditional inputs. You have to provide the
dictionary of conditionals alongside the new input data.
# Model parameters
Suppose you want to change the default behavior of `DATGAN`, such as using a different batch size or the total number of
epochs. In that case, you can do so by passing additional arguments when creating the **DATGAN** instance or using its
two main functions.
## Initialize the model (`DATGAN.__init__`)
| Name | Type | Default | Explanation |
|:---------------------|:-----------:|:------------:|:-----------------------------------------------------------------------------------------------------------------------------------------------------------------------------------------------------------------------------|
| `loss_function` | `str` | `None` | Name of the loss function to be used. If not specified, it will choose between `'WGAN'` and `'WGGP'` depending on the ratio of continuous and categorical columns. Only accepts the values `'SGAN'`, `'WGAN'`, and `'WGGP'`. |
| `label_smoothing` | `str` | `'TS'` | Type of label smoothing. Only accepts the values `'TS'`, `'OS'`, and `'NO'`. |
| `output` | `str` | `'./output'` | Path to store the model and its artifacts. |
| `gpu` | `int` | `None` | Model will automatically try to use GPU if tensorflow can use CUDA. However, this parameter allows you to choose which GPU you want to use. |
| `num_epochs` | `int` | `100` | Number of epochs to use during training. |
| `batch_size` | `int` | `500` | Size of the batch to feed the model at each step. |
| `save_checkpoints` | `bool` | `True` | Whether to store checkpoints of the model after each training epoch. |
| `restore_session` | `bool` | `True` | Whether continue training from the last checkpoint. |
| `learning_rate` | `float` | `None` | Learning rate. The value will be set according to the chosen loss function if set to None. |
| `g_period` | `int` | `None` | Every `g_period` steps, train the generator once. (Used to train the discriminator more than the generator) By default, it will choose values according to the chosen loss function. |
| `l2_reg` | `bool` | `None` | Tell the model to use L2 regularization while training both NNs. By default, it only applies the L2 regularization when using the SGAN loss function. |
| `z_dim` | `int` | `200` | Dimension of the noise vector used as an input to the generator. |
| `num_gen_rnn` | `int` | `100` | Size of the hidden units in the LSTM cell. |
| `num_gen_hidden` | `int` | `50` | Size of the hidden layer used on the generator's output to act as a convolution. |
| `num_dis_layers` | `int` | `1` | Number of layers for the discriminator. |
| `num_dis_hidden` | `int` | `100` | Size of the hidden layers in the discriminator. |
| `noise` | `float` | `0.2` | Upper bound to the gaussian noise added to the label smoothing. (only used if `label_smoothing` is set to `'TS'` or `'OS'`) |
| `conditional_inputs` | `list[str]` | `None` | List of variables in the dataset that are used as conditional inputs to the model. |
| `verbose` | `int` | `1` | Level of verbose. 0 means no print, 1 means that some details will be printed, 2 is mostly used for debugging purposes. |
## Training the model (`DATGAN.fit`)
| Name | Type | Default | Explanation |
|:-----------------------|:------------------:|:-------:|:------------------------------------------------------------------------------------------------------------------------------------------|
| `data` | `pandas.DataFram` | | Original dataset |
| `metadata` | `dict` | `None` | Dictionary containing information about the data in the DataFrame. |
| `dag` | `networkx.DiGraph` | `None` | Directed Acyclic Graph representing the relations between the variables. If no dag is provided, the algorithm will create a linear DAG. |
| `preprocess_data_path` | `str` | `None` | Path to an existing preprocessor. If None is given, the model will preprocess the data and save it under `self.output + '/encoded_data'`. |
## Sampling synthetic data (`DATGAN.sample`)
| Name | Type | Default | Explanation |
|:--------------|:----------------------------:|:-------:|:---------------------------------------------------------------------------------------------------------------------------------------|
| `num_samples` | `int` | | Number of rows in the generated synthetic dataset. |
| `inputs` | `dict` or `pandas.DataFrame` | `None` | Optional input data. **Must** be provided if the model was training with some conditional inputs in the variable `conditional_inputs`. | | | |
| `cond_dict` | `dict` | `None` | Dictionary for the rejection sampling conditionality. |
| `sampling` | `str` | `SS` | Sampling strategy. Only accepts the following values: `'SS'`, `'SA'`, `'AS'`, and `'AA'`. |
| `timeout` | `bool` | `True` | Timeout to stop sampling if the model cannot generated the required data in `cond_dict`. |
When sampling the synthetic data, you can choose between multiple sampling strategies. `S` means we are using simulation
to sample the data, `A` indicates that the model uses argmax. The first letter corresponds to continuous variables and
the second to categorical variables. Therefore, `SA` means we're using simulation for continuous variables and argmax
for categorical variables.
# Tips and tricks
While the **DATGAN** model will automatically choose its parameters if none are provided, we highly recommend the user
to "play" with them. The most important ones are the following:
- `loss_function` Generally, the `WGAN` loss function works better on datasets with more categorical columns than
continuous. It is the contrary for the `WGGP` loss. The `SGAN` loss seems to perform a bit less good than the other
two in the specific cases. However, it seems to perform ok in any case.
- `g_period` This parameter is critical when using either the `WGAN` or the `WGGP` loss. Generally, the latter requires
a lot more discriminator training than the previous. However, it might be interesting to test different values to see
which leads to the best results.
- `l2_reg` The L2 regularization is "mandatory" for the `SGAN` loss and "forbidden" for the `WGAN` loss. The user can
test these other configurations, but it will lead to worse results. However, for the `WGGP` loss, there are no
specific rules on whether to apply it or not. Therefore, it might be interesting to test this parameter as well.
- `learning_rate` It has been fixed depending on the loss function. However, as for any optimization problem, playing
with the learning rate to find the optimal value is always important.
# Contributing
If you want to participate in the development of this model, you can write a Github issue and give us your suggestions
or directly prepare a Pull Request. (However, it would be better first to discuss the content of the PR.)
# Acknowledgements
We want to thank the authors of the [**TGAN**](https://arxiv.org/abs/1811.11264) model, the authors of the
[**CTGAN**](https://arxiv.org/abs/1907.00503) model, and the authors of the
[**CTAB-GAN**](https://arxiv.org/abs/2102.08369) model. These three models have greatly inspired the **DATGAN** model.
# Citation
If you use DATGAN or its evaluation metrics for any of your projects, please cite the following work:
> "[Lederrey G., Hillel T., Bierlaire M., *DATGAN: Integrating Expert Knowledge into Deep Learning for Synthetic Tabular Data*, arXiv preprint arXiv:2203.03489 (2022)](https://arxiv.org/abs/2203.03489)"
The original code for this article can be found in this Github repository: https://github.com/glederrey/SynthPop.


