bimpy - bundled imgui for python
================================
<img src="doc_sources/logo.svg">
<h4 align="center">
<strong>bimpy</strong> is a a native extension for Python built with C++ and <a href="https://github.com/pybind/pybind11"></a> that provides bindings to <a href="https://github.com/ocornut/imgui">dear imgui</a> and distributed as a self-contained package bundled with <a href="https://github.com/glfw/glfw">glfw</a> and <a href="https://github.com/skaslev/gl3w">gl3w</a>
</h4>
<p align="center">
<a href="https://badge.fury.io/py/bimpy"><img src="https://badge.fury.io/py/bimpy.svg" alt="PyPI version" height="18"></a>
<a href="https://pepy.tech/project/bimpy"><img src="https://pepy.tech/badge/bimpy"></a>
<a href="https://opensource.org/licenses/MIT"><img src="https://img.shields.io/pypi/l/bimpy"></a>
<a href="https://api.travis-ci.com/podgorskiy/bimpy.svg?branch=master"><img src="https://travis-ci.org/podgorskiy/bimpy.svg?branch=master"></a>
</p>
Features:
* Immediate mode UI with python. The API is kept as close to the original dear imgui as possible.
* **bimpy** already has all necessary functionality for window/OpenGL context creation and hides those details from the user.
* **bimpy** can display images from ndarrays, PIL Images, numpy arrays, etc.,
* **bimpy** works on Windows, GNU Linux, and macOS.
* **bimpy** does not have dependencies and can be easily built from sources. Building relies only on distutils.
# Hello world with bimpy
Core API tries to map to the Dear ImGui as close as possible. There is additional API, such as `bimpy.App` class that simplifies **bimpy** usage
<table>
<tr><td>
Core API
</td> <td>
Using `bimpy.App` class </td>
</tr>
<tr>
<td>
```python
import bimpy as bp
ctx = bp.Context()
ctx.init(600, 600, "Hello")
s = bp.String()
f = bp.Float()
while not ctx.should_close():
with ctx:
bp.text("Hello, world!")
if bp.button("OK"):
print(s.value)
bp.input_text('string', str, 256)
bp.slider_float("float", f, 0, 1)
```
</td>
<td>
```python
import bimpy as bp
class App(bp.App):
def __init__(self):
super(App, self).__init__(title='Test')
self.s = bp.String()
self.f = bp.Float()
def on_update(self):
bp.text("Hello, world!")
if bp.button("OK"):
print(self.s.value)
bp.input_text('string', self.s, 256)
bp.slider_float("float", self.f, 0, 1)
app = App()
app.run()
```
</td>
</tr>
</table>

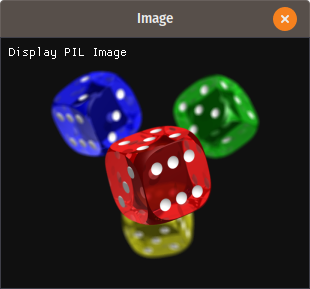
# Display images
Display PIL image:
<table>
<tr><td>
```python
import bimpy
from PIL import Image
ctx = bimpy.Context()
ctx.init(800, 800, "Image")
image = Image.open("test.png")
im = bimpy.Image(image)
while not ctx.should_close():
with ctx:
bimpy.text("Display PIL Image")
bimpy.image(im)
```
</td> <td>
</td>
</tr>
</table>
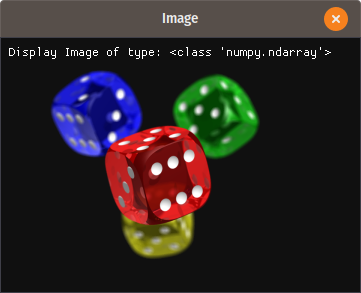
Similarly, numpy arrays with 2 dimensions, 3 dimensions (2, 3 or 4 channels) of type **np.uint8** can be displayed.
Display numpy, ndarray image:
<table>
<tr><td>
```python
import bimpy
from PIL import Image
import numpy as np
ctx = bimpy.Context()
ctx.init(800, 800, "Image")
image = np.asarray(Image.open("3.png"), dtype=np.uint8)
im = bimpy.Image(image)
while not ctx.should_close():
with ctx:
bimpy.text("Display Image of type:")
bimpy.same_line()
bimpy.text(str(type(image)))
bimpy.image(im)
```
</td> <td>
</td>
</tr>
</table>
More examples here: https://github.com/podgorskiy/bimpy/blob/master/examples/image.py
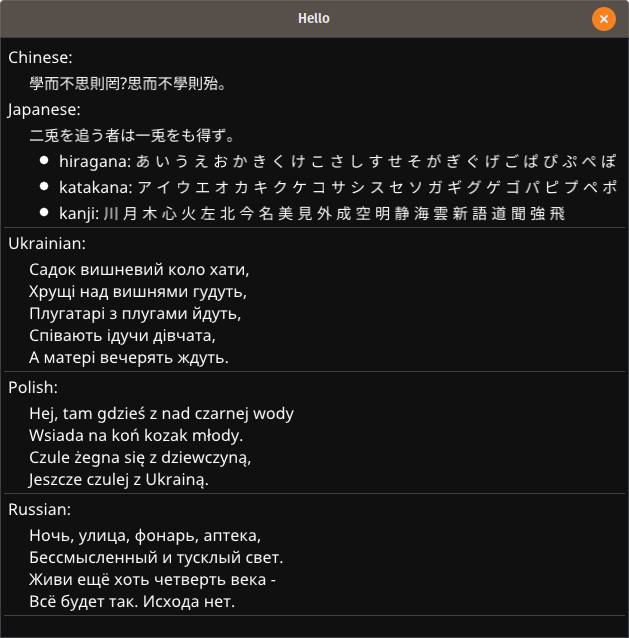
Non-english text
================
Use builtin `bp.load_fonts` to load fonts with CJK, cyrillic, greek characters
<table>
<tr><td>
```python
import bimpy as bp
ctx = bp.Context()
ctx.init(600, 600, "Hello")
bp.load_fonts(
chinese=True,
latin_ext=True,
japanese=True,
cyrillic=True
)
while not ctx.should_close():
with ctx:
chinese = u"學而不思則罔,思而不學則殆。"
japanese = u"二兎を追う者は一兎をも得ず。 "
hiragana = u"あ い う え お か ..."
katakana = u"ア イ ウ エ オ カ ..."
kanji = "川 月 木 心 火 左 北 今..."
ukrainian = "Садок вишневий коло..."
polish = "Hej, tam gdzieś z nad..."
russian = "Ночь, улица, фонарь, ..."
bp.text('Chinese:')
bp.indent()
bp.text(chinese)
bp.unindent()
bp.text('Japanese:')
bp.indent()
bp.text(japanese)
bp.bullet_text("hiragana: " + hiragana)
bp.bullet_text("katakana: " + katakana)
bp.bullet_text("kanji: " + kanji)
bp.unindent()
bp.separator()
bp.text('Ukrainian:')
bp.indent()
bp.text(ukrainian)
bp.unindent()
bp.separator()
bp.text('Polish:')
bp.indent()
bp.text(polish)
bp.unindent()
bp.separator()
bp.text('Russian:')
bp.indent()
bp.text(russian)
bp.unindent()
bp.separator()
```
</td> <td>
</td>
</tr>
</table>
Install
=======
Installation is easy since the package does not have dependencies:
```shell
pip install bimpy
```
Or you can build and install from sources:
```shell
python setup.py install
```
All c/c++ sources are built with distutils. All you need is a compiler with C++11 support.
Windows users, who use python 2.7 may encounter problems, because on Windows, python 2.7 uses MSVC 9.0, which doesn't have support for c++11. However, you still can build it with more recent MSVC (for example MSVC 14.0, which is Visual C++ 2015) using the commands below:
```shell
call "%VS140COMNTOOLS%\VsDevCmd.bat"
set VS90COMNTOOLS=%VS140COMNTOOLS%
python setup.py install
```
If building on Linux, the following dependencies will be needed:
```shell
sudo apt-get install mesa-common-dev libxi-dev libxinerama-dev libxrandr-dev libxcursor-dev
```
To build all wheels for linux package distribution (manylinux) run `build_manylinux_wheels.sh`.
For testing/debugging there is a CMakeList.txt included. It is not used by setup.py, but can be handy in order to build/debug package from certain IDEs.
How to use it?
==============
Intro
-----
**bimpy** is python binding for `dear imgui <https://github.com/ocornut/imgui>`__ and tries to match the C++ API. Also, it has some additional functions to create a window and some other differences.
It has binding for the most functions from **dear imgui**. All functions are renamed from **CamelCase** to **snake_case**, which is more common for python. For example ``ImGui::InputText`` is mapped to ``bimpy.input_text``.
Context and window
------------------
First of all, you need to import **bimpy**
```python
import bimpy
```
Distinctively from **dear imgui**, bimpy does not have global state (**dear imgui** has it by default, but it has an option not to have one). So, you will need to create a context.
```python
ctx = bimpy.Context(width, height, name)
```
Where integers *width* and *height* specify the size of the window, and string *name* is a caption of the window.
All calls to **bimpy**'s API must be within *with* statement applied to the context object:
```python
with ctx:
bimpy.text("Hello, world!")
```
And there must be only one *with* statement applied to the context object per frame.
Or, a second option is to manualy call ``ctx.new_frame()`` before all API calls, and then ``ctx.render()`` after.
```python
ctx.new_frame()
bimpy.text("Hello, world!")
ctx.render()
```
You can have multiple *Context* objects for multiple windows, however, API is not thread-safe.
Variables
------------------
All **imgui** API that provides user input (such as *InputText*, *SliderFloat*, etc.) modifies the variable through the reference to it. However, in python, such objects as integers, floats and strings are passed always by value. Because of this, **bimpy** provides special wrappers, that allow passing those variables by reference.
For example, to use *slider_float*, you will need first to create a variable that will hold the state:
```python
f = bimpy.Float();
```
You can access the value in the following way: ``f.value``
To use it with *slider_float* simply pass it to that function:
```python
bimpy.slider_float("float slider", f, 0.0, 1.0)
```
All **imgui** input functions that provide multiple inputs, like *SliderFloat2*, *SliderInt4*, *InputInt3*, etc. are mapped to equivalent functions, but instead of passing an array of variables, you need to list all variables in the argument list:
```python
f1 = bimpy.Float();
f2 = bimpy.Float();
f3 = bimpy.Float();
while(not ctx.should_close()):
with ctx:
bimpy.slider_float3("float", f1, f2, f3, 0.0, 1.0)
```
Draw commands
------------------
Some draw commands are exposed. In contrast to C++ API, the exposed functions are not methods of **ImDrawList**, but global functions. All drawing functions should be called inside the *begin/end* calls of a window.
List of exposed drawing functions:
```python
add_circle(centre: _bimpy.Vec2, radius: float, col: int, num_segments: int=12, thickness: float=1.0) -> None
add_circle_filled(centre: _bimpy.Vec2, radius: float, col: int, num_segments: int=12) -> None
add_line(a: _bimpy.Vec2, b: _bimpy.Vec2, col: int, thickness: float=1.0) -> None
add_quad(a: _bimpy.Vec2, b: _bimpy.Vec2, c: _bimpy.Vec2, d: _bimpy.Vec2, col: int, thickness: float=1.0) -> None
add_quad_filled(a: _bimpy.Vec2, b: _bimpy.Vec2, c: _bimpy.Vec2, d: _bimpy.Vec2, col: int) -> None
add_rect(a: _bimpy.Vec2, b: _bimpy.Vec2, col: int, rounding: float=0.0, rounding_corners_flags: int=Corner.All, thickness: float=1.0) -> None
add_rect_filled(a: _bimpy.Vec2, b: _bimpy.Vec2, col: int, rounding: float=0.0, rounding_corners_flags: int=Corner.All) -> None
add_rect_filled_multicolor(a: _bimpy.Vec2, b: _bimpy.Vec2, col_upr_left: int, col_upr_right: int, col_bot_right: int, col_bot_lefs: int) -> None
add_triangle(a: _bimpy.Vec2, b: _bimpy.Vec2, c: _bimpy.Vec2, col: int, thickness: float=1.0) -> None
add_triangle_filled(a: _bimpy.Vec2, b: _bimpy.Vec2, c: _bimpy.Vec2, col: int) -> None
```
Simple usage example below:

```python
import bimpy
import numpy as np
ctx = bimpy.Context()
ctx.init(1200, 1200, "Draw Commands Test")
with ctx:
bimpy.themes.set_light_theme()
DATA_POINTS = bimpy.Int(30)
CLASTERS = bimpy.Int(4)
std = bimpy.Float(0.5)
colors = [0x4b19e6, 0x4bb43c, 0x19e1ff, 0xc88200, 0x3182f5, 0xb41e91, 0xf0f046, 0xf032e6, 0xd2f53c,
0xfabebe, 0x008080, 0xe6beff, 0xaa6e28, 0xfffac8, 0x800000, 0xaaffc3, 0x808000, 0xffd8b1,
0x000080, 0x808080, 0xFFFFFF, 0x000000]
datapoints = []
def generate_fake_data():
datapoints.clear()
for i in range(CLASTERS.value):
x = np.random.normal(size=(DATA_POINTS.value, 2))
alpha = np.random.rand()
scale = std.value * np.random.rand(2) * np.eye(2, 2)
position = np.random.rand(2) * 5
rotation = np.array([[np.cos(alpha), np.sin(alpha)], [-np.sin(alpha), np.cos(alpha)]])
x = np.matmul(x, scale)
x = np.matmul(x, rotation)
x += position
datapoints.append((x, rotation, position, scale))
axis = x = np.array([[-1, 0], [1, 0], [0, -1], [0, 1]])
while not ctx.should_close():
ctx.new_frame()
bimpy.set_next_window_pos(bimpy.Vec2(20, 20), bimpy.Condition.Once)
bimpy.set_next_window_size(bimpy.Vec2(800, 600), bimpy.Condition.Once)
bimpy.begin("Drawings")
window_pos = bimpy.get_window_pos()
center = bimpy.Vec2(100, 100) + window_pos
m = 100.0
for i in range(len(datapoints)):
(x, R, P, S) = datapoints[i]
for j in range(x.shape[0]):
point = bimpy.Vec2(x[j, 0], x[j, 1])
bimpy.add_circle_filled(point * m + center, 5, 0xAF000000 + colors[i], 100)
axis_ = np.matmul(axis, S * 2.0)
axis_ = np.matmul(axis_, R) + P
bimpy.add_line(
center + bimpy.Vec2(axis_[0, 0], axis_[0, 1]) * m,
center + bimpy.Vec2(axis_[1, 0], axis_[1, 1]) * m,
0xFFFF0000, 1)
bimpy.add_line(
center + bimpy.Vec2(axis_[2, 0], axis_[2, 1]) * m,
center + bimpy.Vec2(axis_[3, 0], axis_[3, 1]) * m,
0xFFFF0000, 1)
bimpy.end()
bimpy.set_next_window_pos(bimpy.Vec2(20, 640), bimpy.Condition.Once)
bimpy.set_next_window_size(bimpy.Vec2(800, 140), bimpy.Condition.Once)
bimpy.begin("Controls")
bimpy.input_int("Data points count", DATA_POINTS)
bimpy.input_int("Clasters count", CLASTERS)
bimpy.slider_float("std", std, 0.0, 3.0)
if bimpy.button("Generate data"):
generate_fake_data()
bimpy.end()
ctx.render()
```
Acknowledgements
================
* robobuggy https://github.com/gfannes
* njazz https://github.com/njazz
* Florian Rott https://github.com/sauberfred
* zakx https://github.com/zakx
* Joel Linn https://github.com/JoelLinn


